
这是一个创建于 549 天前的主题,其中的信息可能已经有所发展或是发生改变。
自己在学习了 SSL 的相关知识,并简单地开发了
-
( 1 )基于 Spring 的能接通 HTTPS 的服务端
-
( 2 )要求双向 SSL 连接的 Spring 服务
-
( 3 )使用 Spring 中的 RestTemplate 访问 HTTPS 资源
刚刚把这个过程写成了文章,挺开心的想分享一下。如果有错还请指出,觉得有用请夸夸我,谢谢~
全文都在下面
SSL 知识
能够建立彼此信任通讯的数学基石
非对称算法中的密钥对具有这样的特性
( 1 ) 若内容被这对密钥中的密钥 A 所加密,则只能使用密钥 B 解密,密钥 A 自己都不能解密得到原来的内容。反之,密钥 B 加密的内容也只有密钥 A 能解密。
( 2 )不可能使用密钥 A 推出密钥 B 。
( 3 )非对称密钥对有无穷多个且不难生成。
由此,试图通讯的甲乙双方可以自己生产自己的非对称算法密钥对,并毫无顾忌地分享其中一个(这个被分享出去的称为公钥)同时谨慎地保管另一个(称为私钥)。此时,甲若用乙分享的公钥加密了一段自己刚随便生成没有公开的内容,然后将这个加密公开出去,不考虑无限次尝试,碰巧以及乙私钥泄露的情况,那么只有乙能用自己的私钥解密得到这个内容。进而,谁能告诉乙他之前公开的加密内容所对应的原内容是啥,那么那个人一定是甲。
由此,通讯双方可以确认自己在和谁通信,并且在使用公钥加密的基础上,通信内容也只有对方可以解密。
诡计多端的中间人
由上一节我们知道,只要甲和乙已经获知了彼此的公钥,那么甲和乙就可以彼此验明正身,交换只有彼此可知的信息。
但『只要甲和乙已经获知了彼此的公钥』这个条件并不是那么容易确保的。如果有一个中间人丙,它对甲说自己的公钥是乙的公钥,对乙说自己的公钥是甲的公钥。 那么甲就会把丙当做乙,乙也会把丙当做甲。此时甲和乙之间的通讯内容也对丙完全透明了,因为他们加密用的是丙的公钥,自然可以被丙的私钥解密。
怎么避免这样的中间人攻击呢?
( 1 )操作系统都内置一些可信的权威机构的公钥。
( 2 )不想被中间人顶替自己蒙骗自己的通讯者的那一方,向这些被操作系统默认内置的权威机构中的一个注册自己的公钥和自己的信息,并拿到由那个机构基于它的私钥和信息后加密的结果。
( 3 )所有通讯的发起者在验明正身的时候,都必须让另一方说明自己是注册在了哪个权威机构。然后用系统内置的那个权威机构的公钥对内容解密,获得其中的公钥。
中间人此时无法拿自己的公钥来伪造这里的公钥,因为:
( 1 )中间人是不可信的违法犯罪者,没有权威机构的私钥,它使用另外一个私钥的加密结果,用正确的公钥解密,解密的结果里的公钥也不可能是他自己的公钥。而且解密出来的其它信息,比如 IP 信息(或者域名信息)也往往是不可对或者与通讯发起者的目标不一致的,这都会导致通讯发起者认为没有与对的目标建立其绘画
( 2 )由于非对称加密密钥对的性质,无法基于公钥解密的结果,去反推用公钥加密前的内容应该长什么样。
这里的权威机构就是我们说的 CA (Certificate Authority), 也即数字证书认证机构。
证书与相关概念
| CA | Certificate Authority | 数字证书认证机构 | |
| CSR | * Certificate Signing Request | 凭证签发请求 | 站点在向全文机构申请证书前准备的自己的资料(包含公钥但不应当包含私钥)。CA 基于 CSR 签发 Cert 。 |
| Cert | Certificate | 证书 | 一般公钥以及站点的信息已经封装在其中。 |
| X.509 | X.509 | X.509 是密码学里公钥证书的格式标准。符合 X.509 标准的证书里含有公钥、身份信息(比如网络主机名,组织的名称或个体名称等)和签名信息(可以是证书签发机构 CA 的签名,也可以是自签名)。这是最流行的证书标准。 | |
| Key | Private Key | 私钥 | 因为公钥一般都封装在证书中,因此在和 Cert 同时出现的语境中,一般就简单地指私钥。比如保存私钥的文件的后缀名便是 key 。 |
| KeyStore | KeyStore | 无公认的中文说法 | 一个 KeyStore 中可以存放多组密钥对,或证书私钥对,亦或者不成对的。KeyStore 是对 SSL 资料的打包,将多个 SSL 资料文件合并为一个方便使用。 |
| Self-signed CA/Cert | Self-signed CA/Cert | 自签名 CA/证书 | 在局域网,比如公司的内网,只要这个局域网的参与者认可的 CA ,以及由这个 CA 签发的证书。 |
| Mutual SSL/2-way SSL | Mutual SSL/2-way SSL | SSL 双向认证 | 常见的浏览器访问 HTTPS 的站点,其实只是单向验证。我们验证了站点的身份,但站点并不验证我们的身份。而通讯双方都需要彼此验明正身的,就是 SSL 双向认证。 |
| PKCS | Public Key Cryptography Standards | 公钥加密标准 | PKCS #10 为 证书申请标准( Certification Request Standard ), 规范了向证书中心申请证书之 CSR ( certificate signing request )的格式。PKCS 下共有 15 个子项,每个子项对应一个公钥加密标准的所涉及的技术的标准规范。 |
| openssl | openssl 是一个命令,也是一个开源工具库,其实现了基本的加密功能,实现了 SSL 与 TLS 协议,是生成 SSL 和 TLS 的必要材料的基础工具。 | ||
| keytool | keytool 是 JDK 中负责 SSL/TLS 和 keystore 的工具。可以帮助生成,管理和阅读 keystore 文件。 |
** 亦可用 Certificate Request 指 CSR ,在 openssl 的 Linux 手册中,使用 Certificate Request 而非 Certificate Signing Request ,但说的是同一个东西。
Self-signed CA
我在自己的 windows PC 上开了一个 Unbutun 的虚拟机,在更新了 openssh ,安装 Java 环境(确保 JDK 中的 keytool 可用)后,使用这个虚拟机作为自签名 CA 来签发 Cert 。
参考资料:
- X.509 Authentication in Spring Security
- man openssl
- man openssl req
- man oepnssl x509
- man openssl pkcs12
- man keytool
作为 CA ,我们也需要有自己的证书,使用如下命令创建:
openssl req -x509 -sha256 -days 3650 -newkey rsa:4096 -keyout rootCA.key -out rootCA.crt
- openssl: OpenSSL is a cryptography toolkit implementing the Secure Sockets Layer (SSL v2/v3) and Transport Layer Security (TLS v1) network protocols and related cryptography standards required by them. The openssl program is a command line tool for using the various cryptography functions of OpenSSL's crypto library from the shell.
- req: PKCS#10 X.509 Certificate Signing Request ( CSR ) Management.
- -x509: this option outputs a self signed certificate instead of a certificate request. This is typically used to generate a test certificate or a self signed root CA .
- -sha256: -[digest] this specifies the message digest to sign the request with (such as -md5, -sha1). Here, the digest is sha256. 指定生成的证书中,证书内容的摘要所用的算法。此处为 SHA256 。
- -days 3650: 该证书将在 3650 天后过期。
- -newkey rsa:4096: this option creates a new certificate request and a new private key. The argument takes one of several forms. rsa:nbits, where nbits is the number of bits, generates an RSA key nbits in size. If nbits is omitted, i.e. -newkey rsa specified, the default key size, specified in the configuration file is used.
- -keyout rootCA.key: 将生成的私钥保存到当前工作路径下的 rootCA.key 文件。
- -out rootCA.crt: 将生成的证书保存为工作路径下的 rootCA.crt 文件。
这个命令执行后,会要求你输入一个密码以保护私钥。这个密码会加密私钥,但这不意味着 rootCA.key 文件用记事本打开会是大片乱码。
同时,这个命令也会要求你输入这个证书所颁发的对象的基本信息,如所在的国家,省份,市区,公司单位名称以及 Common Name ,就像下面一样:
-----
You are about to be asked to enter information that will be incorporated
into your certificate request.
What you are about to enter is what is called a Distinguished Name or a DN.
There are quite a few fields but you can leave some blank
For some fields there will be a default value,
If you enter '.', the field will be left blank.
-----
Country Name (2 letter code) [AU]:CN
State or Province Name (full name) [Some-State]:SH
Locality Name (eg, city) []:SH
Organization Name (eg, company) [Internet Widgits Pty Ltd]:NA
Organizational Unit Name (eg, section) []:NA
Common Name (e.g. server FQDN or YOUR name) []:bob
Email Address []:.

Please enter the following 'extra' attributes
to be sent with your certificate request
A challenge password []:abc
String too short, must be at least 4 bytes long
A challenge password []:abcde
An optional company name []:NA
所有生产证书的指令都会要求这些信息,包括使用此时生成的根证书签发新的证书。
能与服务端建立单向 SSL 连接
在 Windows PC 上写 Spring 程序,写好之后 jar 包扔到虚拟机上跑。虚拟机的 IP 是 192.168.19.128。要让 https://192.168.19.128/ 能够被成功访问,要为这个程序签发证书并让程序加载它,在收到 SSL 请求时使用它。
生成 CSR
openssl req -new -newkey rsa:4096 -keyout localhost.key -out localhost.csr
- -new: this option generates a new certificate request.
- -out localhost.csr: 生成的 CSR 保存为工作路径下的 localhost.scr 文件。
获得 Cert 所需的其它信息
在当前工作路径下创建 localhost.ext 文件,内容如下:
authorityKeyIdentifier=keyid,issuer
basicConstraints=CA:FALSE
subjectAltName = @alt_names
[alt_names]
IP.1 = 192.168.19.128
如果使用的是域名而非 IP ,则 IP.1 那一行可以改为 DNS.1 = localhost。
使用 Self-signed CA 签发 localhost 证书
openssl x509 -req -CA rootCA.crt -CAkey rootCA.key -in localhost.csr -out localhost.crt -days 365 -CAcreateserial -extfile localhost.ext
- -CA rootCA.crt: 指定签发证书的 CA 的证书是在当前工作路径下的 rootCA.crt 文件。
- -CAkey rootCA.key:指定签发证书的 CA 的私钥保存在 rootCA.key 文件中。
- -in localhost.scr: 请求证书者的简历,其中最重要的是包含公钥。
- -out localhost.crt: 为请求者签发的证书输出为当前工作目录下的 locahost.crt 文件
- -days 365: 签发的这个证书有效期为 365 天,即一年。
- -CAcreateserial: with this option the CA serial number file is created if it does not exist: it will contain the serial number "02" and the certificate being signed will have the 1 as its serial number. Normally if the -CA option is specified and the serial number file does not exist it is an error.
- -extfile localhost.ext: 在签发证书的时,参考 localhost.ext 进行签发并在证书中写入对应信息。
有了这个证书之后,就可以让虚拟机上运行的 spring boot 程序加载它,进而做到使用 https 访问该 spring boot 程序。
不过我们需要先将证书 (localhost.crt) 和私钥 ( localhost.key )打包为一个 keystore 。
openssl pkcs12 -export -out localhost.p12 -name "localhost" -inkey localhost.key -in localhost.crt
- pkcs12: The pkcs12 command allows PKCS#12 files (sometimes referred to as PFX files) to be created and parsed.
- -export: This option specifies that a PKCS#12 file will be created rather than parsed.
- -out localhost.p12: 创建的 pkcs12 的 keystore 保存为工作目录下的 localhost.p12 文件。
- -name: This specifies the "friendly name" for the certificate and private key. This name is typically displayed in list boxes by software importing the file.
- -inkey localhost.key: 指明私钥保存在工作目录下的 localhost.key 文件中。
- -in localhost.crt: 指明证书保存在工作目录下的 localhost.crt 文件中。
此命令执行后会需要输入私钥的密码。
配置 Spring Boot 程序
在配置文件中添加如下配置,从而告知 Spring Boot 服务 enable SSL 以及有人试图与它建立 SSL 连接时,使用何处的证书:
server.ssl.enabled=true
server.ssl.key-store=/root/localhost.p12
server.ssl.key-store-password=xavier
server.ssl.key-alias=localhost
server.ssl.key-password=xavier
server.port=8443
除此之外在一个 @RestController 的类下增加一个 RequestMapping:
    @RequestMapping("/")
    public String index() {
        return LocalDateTime.now().format(DateTimeFormatter.ISO_DATE_TIME);
    }
随后在 Windows PC 上用 https://192.168.19.128/ 访问这个地址,会发现浏览器警告建立的连接是不可靠的。
配置客户端
在 Windows PC 上用 https://192.168.19.128/ 访问这个地址,会发现浏览器警告建立的连接是不可靠的。
这是因为 Self-signed CA 并不是权威的,广受信任的证书签发机构,因此其证书并未内置在 Windows 系统的信任证书库中。
我们必须先将 rootCA.cer 证书从虚拟机中下载到 Windows PC ,并安装在『受信任的根证书颁发机构』中。随后重启浏览器再次访问,才能一切顺利。
同时在『获得 Cert 所需的其它信息』中我们提到 IP.1 = 192.168.19.128 这样一个配置。这里配置的 IP 地址会被填入到 localhost.cer 中。浏览器与 Spring Boot 程序建立 SSL 连接时,会收到 Spring Boot 发来的 localhost.cer,并校验自己的目的地与证书中的这个 IP.1 是不是一致。如果不一致,则即便信任根证书,也依然警告该 SSL 连接不安全。
客户端能与服务端建立双向 SSL 连接
为客户端签发证书
openssl req -new -newkey rsa:4096 -nodes -keyout clientBob.key -out clientBob.csr
在索要基本信息的环节中,指定 Commen Name 为 bob 。设定私钥密码( challenge password )为 abcdef 。如此私钥和 CSR 生成完毕。
然后签发证书。
openssl x509 -req -CA rootCA.crt -CAkey rootCA.key -in clientBob.csr -out clientBob.crt -days 365 -CAcreateserial
将证书以及私钥打包为一个 pkcs12 的 keystore
openssl pkcs12 -export -out clientBob.p12 -name "clientBob" -inkey clientBob.key -in clientBob.crt
此时会要求你输入密码,这个密码是这个 keystore 的,而不是这个私钥的。我们仍然使用 abcedf 作为密码。
然后使用 keytool 转换为易于 Java 处理的 JKS 的 keystore
keytool -importkeystore -srckeystore clientBob.p12 -srcstoretype pkcs12 -destkeystore clientBob.jks -deststoretype pkcs12 -deststorepass abcdef -srcstorepass abcdef
上述命令运行时的 JDK 环境是 17 ,keytool 是 JDK 中的工具,因此非 JDK 17 环境,或解析这个生成的 keystore 文件的 java 程序的 JDK 版本低于 17 都可能造成问题。如果上述命令在你的电脑上直接无法运行,可将 -deststoretype pkcs12 改为 -deststoretype jks 。pkcs12 是最新的 keystore 组装策略,而 jks 则是老版本了,老 JDK 也该支持。
将这一步中得到的私钥 clientBob.key ,clientBob.jks 以及 clientBob.cer 从虚拟机中转存到 Windows PC 以待之后使用。
为服务端程序设置要求验证客户端身份
Spring Boot 程序开启 SSL 只代表着它会将自己的证书发出去让别人确认它的身份,而不代表着它也会验证别人的身份。
开启 Mutual SSL 意味着 Spring Boot 会要求客户端发来证书的信息并加以解析。要实现这一点,需要引入 spring security
        <dependency>
            <groupId>org.springframework.boot</groupId>
            <artifactId>spring-boot-starter-security</artifactId>
        </dependency>
并配置 Spring Security 开启验证:
@Configuration
@Profile("server")
@Slf4j
public class ServerConfiguration {

    @Value("${server.ssl.valid-commonname}")
    private List<String> validCommonNameList;

    @Bean
    public SecurityFilterChain filterChain(HttpSecurity http) throws Exception {
        http.authorizeRequests()
                .anyRequest()
                .authenticated()
                .and()
                .x509()
                .subjectPrincipalRegex("CN=(.*?)(?:,|$)")
                .userDetailsService(userDetailsService());
        return http.build();
    }

    @Bean
    public UserDetailsService userDetailsService() {
        return new UserDetailsService() {
            @Override
            public UserDetails loadUserByUsername(String username) {
                log.info("common name = {}", username);
                return new ValidCert(username, CollectionUtils.contains(validCommonNameList.listIterator(), username));
            }
        };
    }
}
配套的 UserDetails 实现类:
@Getter
public class ValidCert implements UserDetails {

    private final String commonName;
    private final boolean isEnabled;

    public ValidCert(String commonName, boolean isEnabled) {
        this.commonName = commonName;
        this.isEnabled = isEnabled;
    }

    @Override
    public Collection<? extends GrantedAuthority> getAuthorities() {
        return Collections.emptyList();
    }

    @Override
    public String getPassword() {
        return null;
    }

    @Override
    public String getUsername() {
        return getCommonName();
    }

    @Override
    public boolean isAccountNonExpired() {
        return true;
    }

    @Override
    public boolean isAccountNonLocked() {
        return true;
    }

    @Override
    public boolean isCredentialsNonExpired() {
        return true;
    }

    @Override
    public boolean isEnabled() {
        return this.isEnabled;
    }
}
通过在配置文件中指定 server.ssl.valid-commonname 的值为 bob ,实现只有客户端使用 commen name 为 bob 的证书与这个 Spring Boot 建立 SSL 连接才有可能被接受,否则都会拒绝。
服务端信任 Self-signed CA
现在,我们需要配置 Self-signed CA 是这个 Spring Boot 可以信任的证书。换言之,包含 Self-signed CA 的证书的 Keystore 是 trustKeyStore:
keytool -import -trustcacerts -noprompt -alias ca -ext san=dns:localhost,ip:127.0.0.1 -file rootCA.crt -keystore truststore.jks
因此需要借助 JDK 工具 keytool 生成 keystore 文件,以便之后 Spring Boot 读取。
随后在 Spring Boot 配置文件中指定加载与信任此 keystore 中的证书:
server.ssl.trust-store=/root/truststore.jks
server.ssl.trust-store-password=${password}
server.ssl.client-auth=need

server.ssl.valid-commonname=bob
统合之前让 Spring Boot 程序加载自己的证书( localhost.crt )的配置,现在 application-server.properties 中的所有配置如下:
server.ssl.key-store=/root/localhost.p12
server.ssl.key-store-password=xavier
server.ssl.key-alias=localhost
server.ssl.key-password=xavier
server.ssl.enabled=true
server.port=8443

server.ssl.trust-store=/root/truststore.jks
server.ssl.trust-store-password=xavier
server.ssl.client-auth=need
server.ssl.valid-commonname=xavier

logging.level.org.springframework.security=DEBUG
将程序打包为可执行的 jar 文件后存入虚拟机,调用 java -jar -Dspring.profiles.active=server xxx.jar 使得程序运行。
Postman
在 Postman 的 Settings 中的 Certificates 中为访问特定 host 与端口设定访问时使用的证书与证书私钥文件(以及私钥的密码)后,Postman 在发出请求给那个 host 与端口时会携带上这个证书的信息。
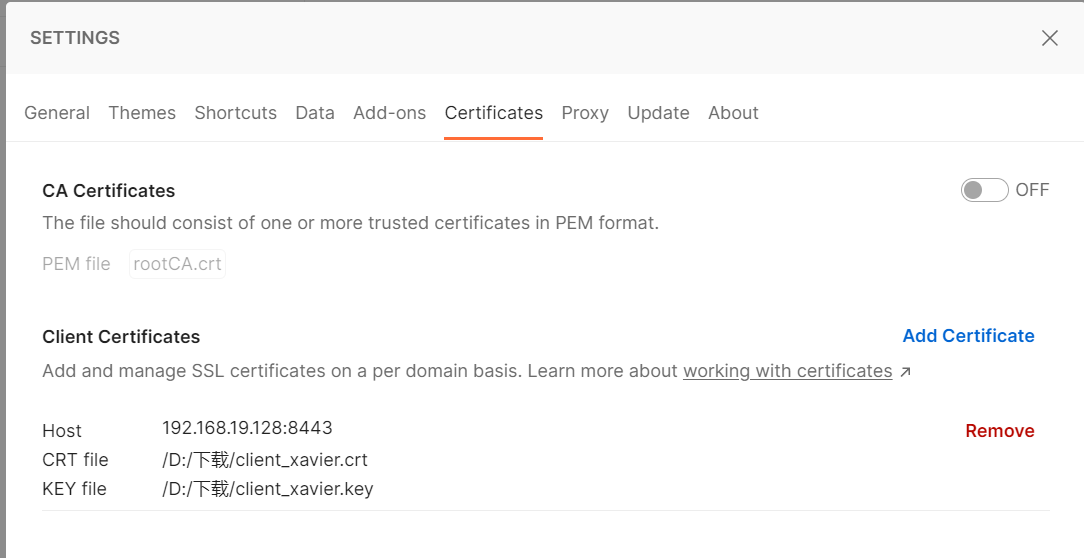
此时 https://192.168.19.128:8443/ 才会得到期待的返回结果,如果不进行此设置,应道返回 401 Unauthorized 错误。
使用 Spring 中的 RestTemplate 访问服务端
本地运行另一个 Spring 程序,这个程序在收到请求后会调用 RestTemplate 将请求发给虚拟机上的服务,将得到的请求结果原样返回。
@Profile("client")
@RestController
@Slf4j
@RequestMapping("/client")
public class ClientController {

    private RestTemplate restTemplate;

    @Autowired
    public void setRestTemplate(RestTemplate restTemplate) {
        this.restTemplate = restTemplate;
    }

    @RequestMapping("/")
    public String client() {
        final ResponseEntity<String> responseEntity = restTemplate.getForEntity("https://192.168.19.128:8443/", String.class);
        return responseEntity.getBody();
    }
}
如果只是简单的创建一个 RestTemplate 的实例,它是不能够建立起 SSL 连接,也自然无法建立 HTTPS 连接,调用 HTTPS 资源的。但 Spring 在设计 RestTemplate 还有一个接受 ClientHttpRequestFactory 接口的实例的构造方法。并且为这个接口提供了对应 Apache Http Components v4 和 OkHttp v3 的适配器类 HttpComponentsClientHttpRequestFactory 和 OkHttp3ClientHttpRequestFactory,这使得我们可以借助 Apache Http Components 或 OkHttp 这样成熟的开源 Http Client 库。
首先 Spring 内置的 Apache Http Core 已经不足用了,需要引入 Apache Http Components:
    <dependency>
        <groupId>org.apache.httpcomponents</groupId>
        <artifactId>httpclient</artifactId>
        <version>4.5.14</version>
    </dependency>
显然在配置可以创建 SSL 连接的请求工厂的过程中,需要指定发起者使用的 KeyStore 以及 KeyStore 和使用的私钥的密码。
先将『为客户端签发证书』一章中得到的 clientBob.jks 保存到正在编写的客户端程序的 resouces 文件夹下。随后在配置文件中指定路径和密码。
rest.ssl.client:
  bob:
    keyStoreFile: classpath:clientBob.jks
    keyStorePwd: abcdef
    privateKeyPwd: abcdef
为这个配置编写一个 POJO 类:
@Getter
@ToString
public class ClientKeyStoreInfo {

    private Resource keyStoreFile;
    private String keyStorePwd;
    private String privateKeyPwd;

    public void setKeyStoreFile(Resource keyStoreFile) {
        if (this.keyStoreFile == null) {
            this.keyStoreFile = keyStoreFile;
        }
    }

    public void setKeyStorePwd(String keyStorePwd) {
        if (this.keyStorePwd == null) {
            this.keyStorePwd = keyStorePwd;
        }
    }

    public void setPrivateKeyPwd(String privateKeyPwd) {
        if (this.privateKeyPwd == null) {
            this.privateKeyPwd = privateKeyPwd;
        }
    }
}
配置类如下:
@Profile("client")
@Configuration
@Slf4j
public class ClientConfiguration {

    @Bean
    @Qualifier("clientBob")
    @ConfigurationProperties("rest.ssl.client.bob")
    public ClientKeyStoreInfo clientBob() {
        return new ClientKeyStoreInfo();
    }

    @Bean
    public RestTemplate restTemplate() throws Exception {
        ClientKeyStoreInfo client = clientBob();
        log.info("client xavier: {}", client);

        //SSL Context 是 JDK 中的东西
        final SSLContext sslContext = new SSLContextBuilder()
                //.setKeyStoreType("jks")
                .setKeyStoreType("pkcs12") // 说明 keystore 的组织格式
                .loadKeyMaterial(client.getKeyStoreFile().getURL(), //loadKeyMaterial 声明了建立 SSL 连接时我方作为发起者所用到的 keystore 的信息
                        client.getKeyStorePwd().toCharArray(),
                        client.getPrivateKeyPwd().toCharArray())
                .loadTrustMaterial((TrustStrategy) (chain, authType) -> true) // loadTrustMaterial 需要我们提供一个根据对方提供的证书,判断对方是否可信的处理器。此处我们简单地无论如何都返回 true 。
                .build();

        // SSLConnectionSocketFactory 和 CloseableHttpClient 都是 Apache HTTP Components 中的东西,基于 JDK 的 SSLContext 做了进一步封装。
        SSLConnectionSocketFactory sslConFactory = new SSLConnectionSocketFactory(sslContext);

        final CloseableHttpClient httpClient = HttpClients.custom()
                .setSSLSocketFactory(sslConFactory)
                .build();

        // RestTemplate 提供一个接收 ClientHttpRequestFactory 的实例的 HttpReqeust 工厂并提供 HttpComponentsClientHttpRequestFactory 作为 Apache HTTP Components 的适配器类,以方便我们快速利用 Apache HTTP Components
        ClientHttpRequestFactory requestFactory = new HttpComponentsClientHttpRequestFactory( httpClient);

        RestTemplate restTemplate = new RestTemplate(requestFactory);

        return restTemplate;
    }
}
配置类中的细节请见代码中的注解部分。
至此,我们再添加一个 /client 接口,Postman 调用这个接口时,Spring 程序会调用 RestTemplate 去调用下一个 Linux 虚拟机中的服务端并将得到的结果返回。
@Profile("client")
@RestController
@Slf4j
@RequestMapping("/client")
public class ClientController {

    private RestTemplate restTemplate;

    @Autowired
    public void setRestTemplate(RestTemplate restTemplate) {
        this.restTemplate = restTemplate;
    }

    @RequestMapping("/")
    public String client() {
        final ResponseEntity<String> responseEntity = restTemplate.getForEntity("https://192.168.19.128:8443/", String.class);
        return responseEntity.getBody();
    }
}
全文完。
 |
1
blankmiss 2023-05-29 23:45:45 +08:00
自有证书 防止别人逆向抓接口吗
|
 |
2
npe 2023-05-30 09:31:41 +08:00
赞!写得不错,最好把 TLS 加密套件写一下.
|
 |
3
julyclyde 2023-05-30 11:07:12 +08:00
这其中,你自己的创新是哪部份?
|