先放个链接: https://github.com/lazyFrogLOL/llmdocparser
目前有很多方案用于 RAG 的 text chunking 部分,例如最著名的就是 Langchain 项目中集成的 Unstructure。 Unstructure 的优势在于,集成了一整套 OCR 、版面分析等方案,输出丰富的 text chunks 。不过它没法解决文档中图片、图表的解析。
然后最近有一个比较火的项目,gptpdf,它使用 PyMuPDF 对 pdf 的版面进行解析,通过设定一定规则,合并文本区域,并且标注出图片图表区域,将这些统统扔给 GPT-4o 或者 Qwen-VL 这样的多模态模型识别,生成一个完整的 markdown 格式文档。
这个项目特别简洁,一共就不到 300 行代码。
我读完后,觉得目前目标是直接构建能够用于 RAG 索引的 text chunks 。那么是否最后输出 markdown 其实也没那么重要。于是在它的思路上又做了一些改造,形成了一套新的 PDF 解析方案llmdocparser。
下面我来介绍一下整个方案。
流程介绍
首先,我们仍然需要进行版面分析,gptpdf 使用了规则进行版面分析,我这里用的是 paddleocr 的 PPStructure 模型,

它的解析能够生成每一页各个区域的类别、位置及阅读顺序信息,示例如下,
[{'header': ((101, 66, 436, 102), 0)},
 {'header': ((1038, 81, 1088, 95), 1)},
 {'title': ((106, 215, 947, 284), 2)},
 {'text': ((101, 319, 835, 390), 3)},
 {'text': ((100, 565, 579, 933), 4)},
 {'text': ((100, 967, 573, 1025), 5)},
 {'text': ((121, 1055, 276, 1091), 6)},
 {'reference': ((101, 1124, 562, 1429), 7)},
 {'text': ((610, 565, 1089, 930), 8)},
 {'text': ((613, 976, 1006, 1045), 9)},
 {'title': ((612, 1114, 726, 1129), 10)},
 {'text': ((611, 1165, 1089, 1431), 11)},
 {'title': ((1011, 1471, 1084, 1492), 12)}]
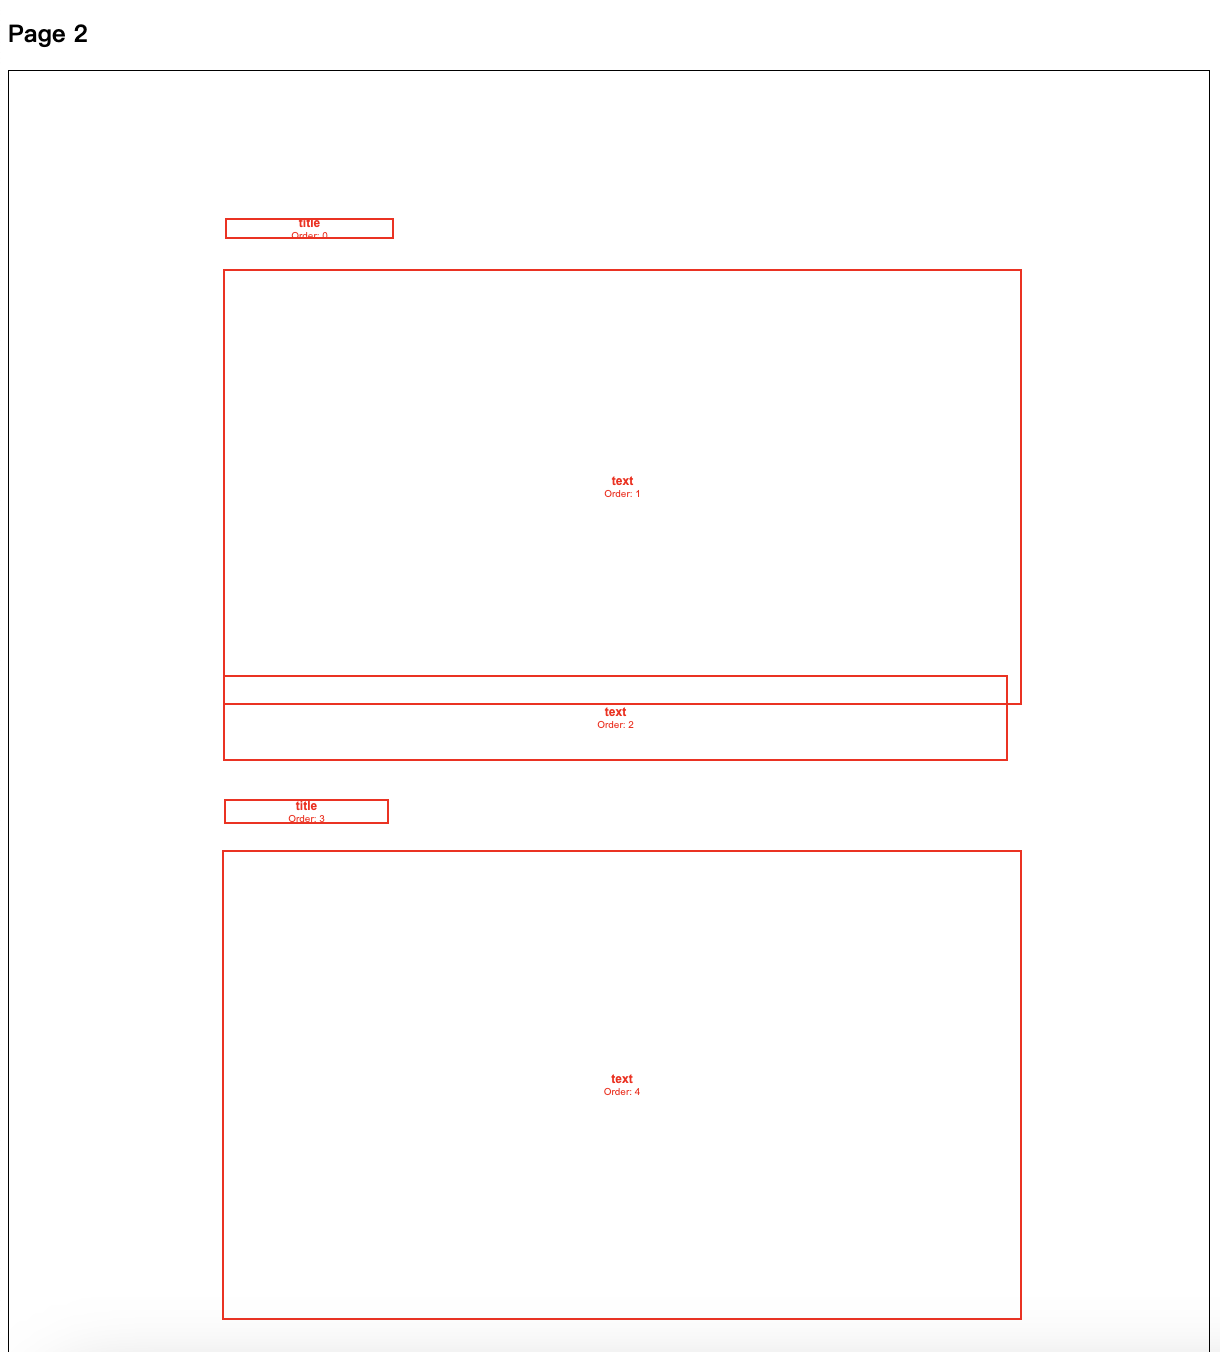
基于这个信息,能够设定丰富一些的规则,来进行区域的合并。例如下图是一个版面分析的结果:

基于一些现实的情况,我们可以设置让重叠的区域合并,title 类型和接下来的一个 text 类型的区域合并等。
合并完成后,更新了区域的位置,然后将每个区域保存成图片,以供后续大模型解析。
当然,这里其实有挺多种状况值得处理,例如版面分析时,有些图片没有被定位到。这里就仍然需要使用 PyMuPDF 也解析一遍页面,获取它的解析结果。然后和模型解析的结果进行对比,补充未被识别的区域。
最后,所有的图片将一一传送给多模态大模型进行解析,形成一个 text chunks 表格: | filepath | type | page_no | filename | content | |-------------------------------------------|-----------------|---------|---------------------------|-----------------------| | output/page_1_title.png | Title | 1 | attention is all you need | [Text Block 1] | | output/page_1_text.png | Text | 1 | attention is all you need | [Text Block 2] | | output/page_2_figure.png | Figure | 2 | attention is all you need | [Text Block 3] | | output/page_2_figure_caption.png | Figure caption | 2 | attention is all you need | [Text Block 4] | | output/page_3_table.png | Table | 3 | attention is all you need | [Text Block 5] | | output/page_3_table_caption.png | Table caption | 3 | attention is all you need | [Text Block 6] | | output/page_1_header.png | Header | 1 | attention is all you need | [Text Block 7] | | output/page_2_footer.png | Footer | 2 | attention is all you need | [Text Block 8] | | output/page_3_reference.png | Reference | 3 | attention is all you need | [Text Block 9] | | output/page_1_equation.png | Equation | 1 | attention is all you need | [Text Block 10] |
这个表格中包含了,区域截图的位置、类型、页码,文件名以及对应解析出来的文本块。
后续这个用法就比较丰富了,假如是图片类型的文本块被检索到,则可以在回答中返回这个截图的位置,前端进行渲染后,生成图文并茂的回答。
总结
具体的用法可参加项目的 README 文档,特别简单,
Installation
pip install llmdocparser
Usage
from llmdocparser.llm_parser import get_image_content

content = get_image_content(
    llm_type="azure",
    pdf_path="path/to/your/pdf",
    output_dir="path/to/output/directory",
    max_concurrency=5,
    azure_deployment="azure-gpt-4o",
    azure_endpoint="your_azure_endpoint",
    api_key="your_api_key",
    api_version="your_api_version"
)
print(content)
这里需要注意的是,项目支持 Azure 、OpenAI 、DashScope 三种服务商,llm_type 如果是 azure 的话,则需要传入 azure_deployment 和 azure_endpoint 参数。
假如是调用兼容 OpenAI 接口格式的 API ,则传入 base_url 和 api_key 即可。
这个项目也并不复杂,如果有疑问,可以提个 issue 。
1
zqqian 161 天前
目前使用过效果最好的 pdf 解析是 doc2x
你可以对比一下看看效果 |
2
freddiechan99211 OP @zqqian 嗯,doc2x 确实很不错。我主要是想开源一种思路。
|